


Bulk Add Employees in Attendo (formerly Petpooja Payroll)
Twenty new joiners, twenty trips through the same form. A spreadsheet does that job once.
Managing employee records manually can slow your entire payroll process. Whether you’re onboarding new staff or restructuring teams, entering employee data one by one is not just tedious, it’s a recipe for delays and data errors.
With Attendo, Bulk Staff Import lets you add a whole joining batch from one spreadsheet instead of typing each record in. This guide walks you through the complete process, from accessing the dashboard to confirming a successful import.
Key Takeaways
- One sheet replaces one form per person, which is the whole point of the feature
- Start from the sample template: it names the fields Attendo expects, and a sheet that does not match is where most failed imports begin
- Department and designation names must match the lists already in Attendo, or a typo quietly creates a new one
- Imported employees still need biometrics registered at the device, attendance permissions set, and the right Payroll Group
- Migrating employees, attendance history or legacy payroll from a previous system is handled by the support team, not by an upload
Step 1: Open the Attendo Dashboard
Once you log in to Attendo, you’ll land on the Dashboard, the control centre for your organisation’s HR and attendance activities.
Here you can instantly view:
- Total employees
- Attendance summaries
- Department-wise insights
- Pending biometric setups
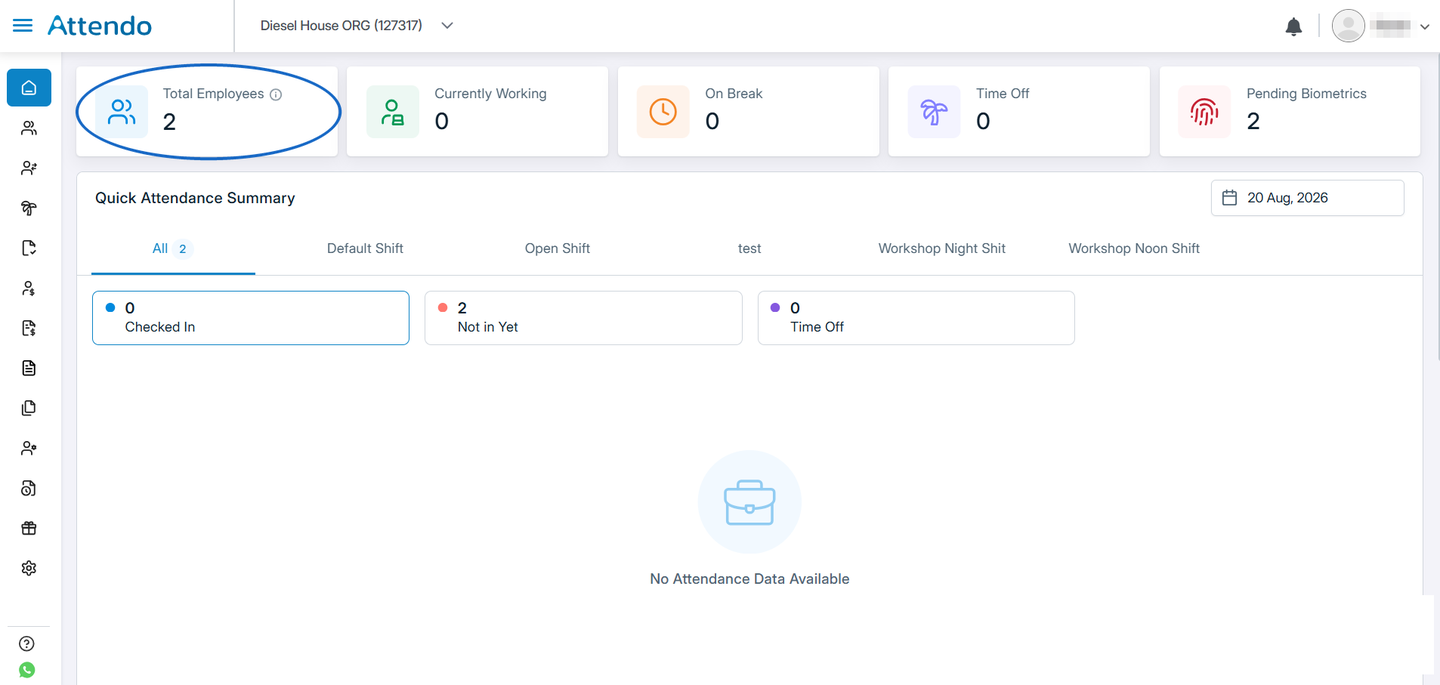
This screen is the same data the rest of Attendo works from, so anything added here shows up in attendance and payroll straight away.
Step 2: Open the Employees Section
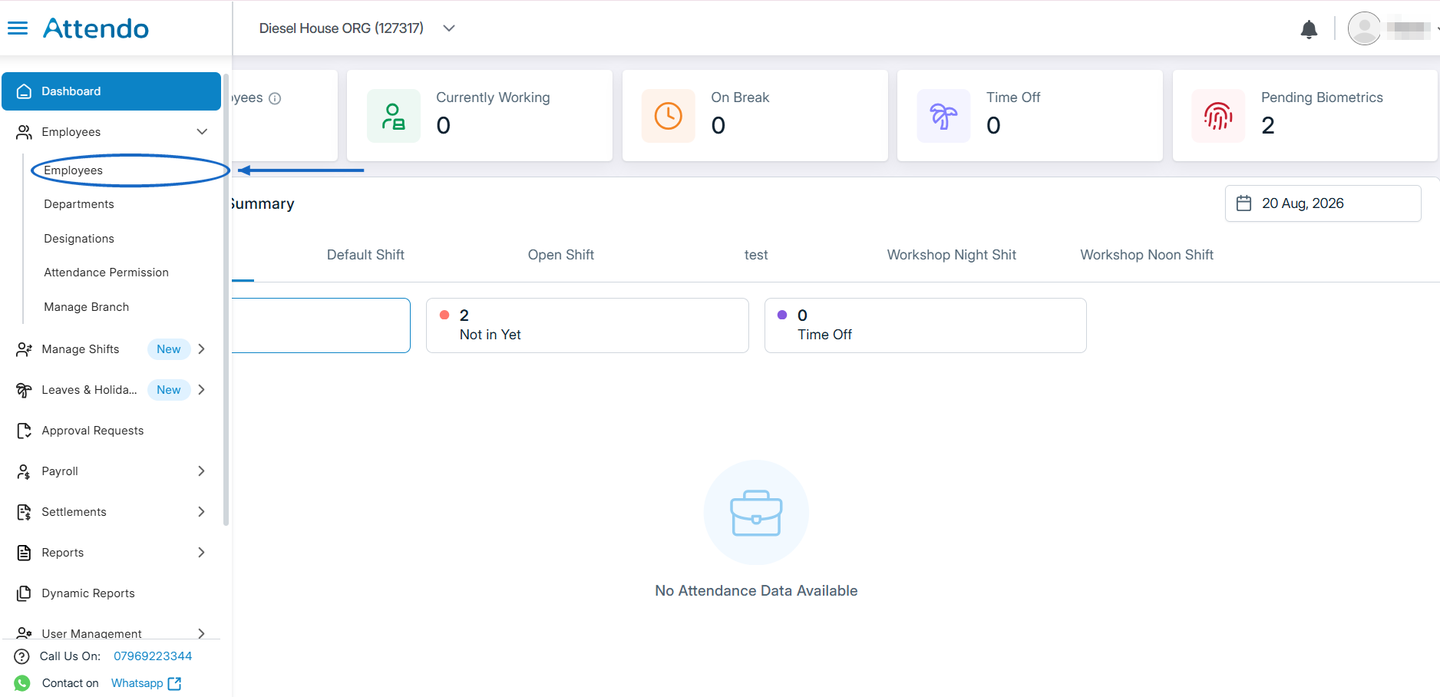
From the left navigation menu, open Employees, then click Employees in the list that expands. Everything to do with staff records lives here: adding, importing, editing and exporting. The same menu holds Departments, Designations, Attendance Permission and Manage Branch, which matters for the next step, because a department or designation has to exist here before an imported row can point at it. This is also the employee master, so each record carries far more than the sheet supplies. Attendance method, mobile and geofencing toggles, KYC status, salary structure, leave balances and settlements history all hang off it once the person exists.
Step 3: Download the Employee Import Template
Before importing your staff list, it’s important to use the correct format.
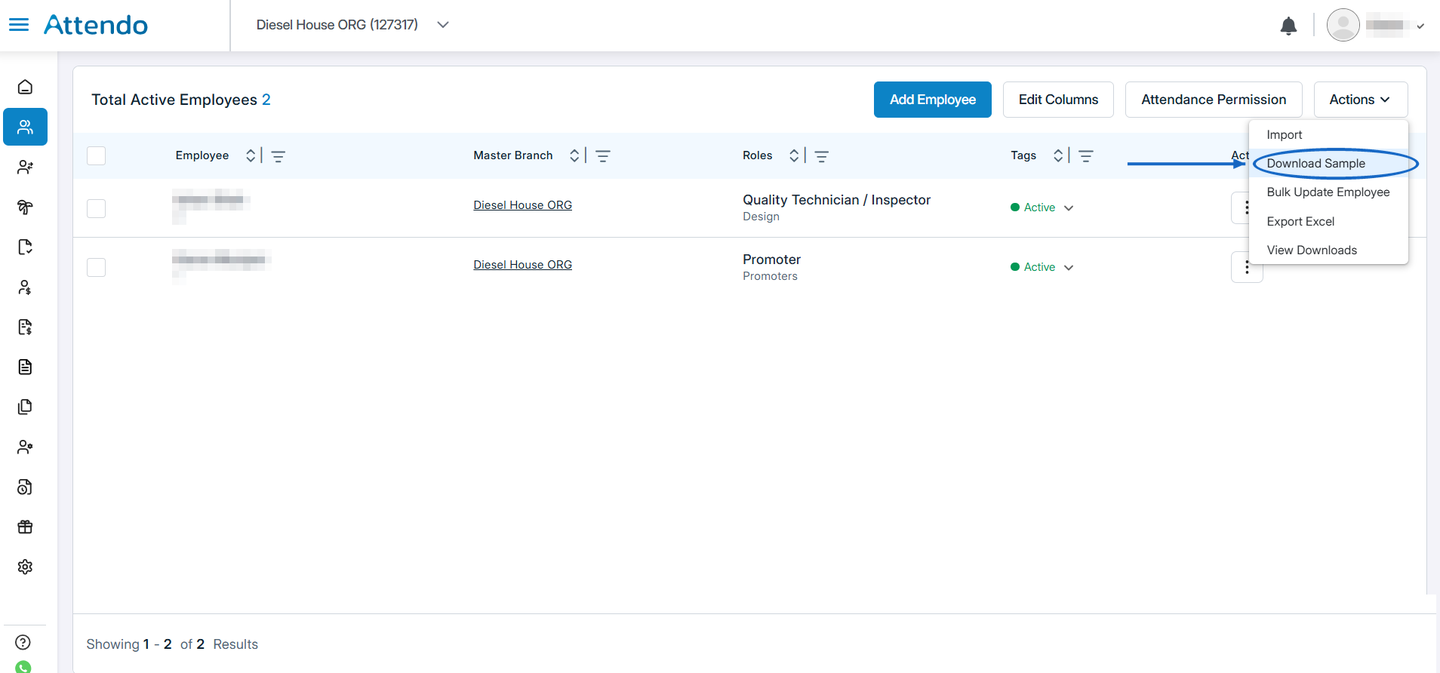
Click on Actions → Download Sample to get a preformatted Excel/CSV template.
Why This Step Matters
The sample file defines the structure Attendo expects. Each row is one employee, and these are the columns it asks for:
| Column | What goes in it | Where it shows up later |
|---|---|---|
| Name | The employee’s full name as it should appear on the payslip | Payslips, reports, the Employee column across every table |
| Department | Must match a department already in Attendo, exactly | Department-wise reporting, and the Roles column |
| Designation | Must match an existing designation, exactly | The Roles column, shown above the department |
| Date of Joining | The joining date, which decides the first payable month | Leave accrual and the first payroll run |
| Branch | The branch this person punches at | Which device syncs them, and branch-wise reports |
Fill in the sheet carefully and save it in .xlsx or .csv format.
Step 4: Upload Your Employee List
Once your file is ready, go back to the Employees screen, click Actions → Import, and upload your completed sheet.
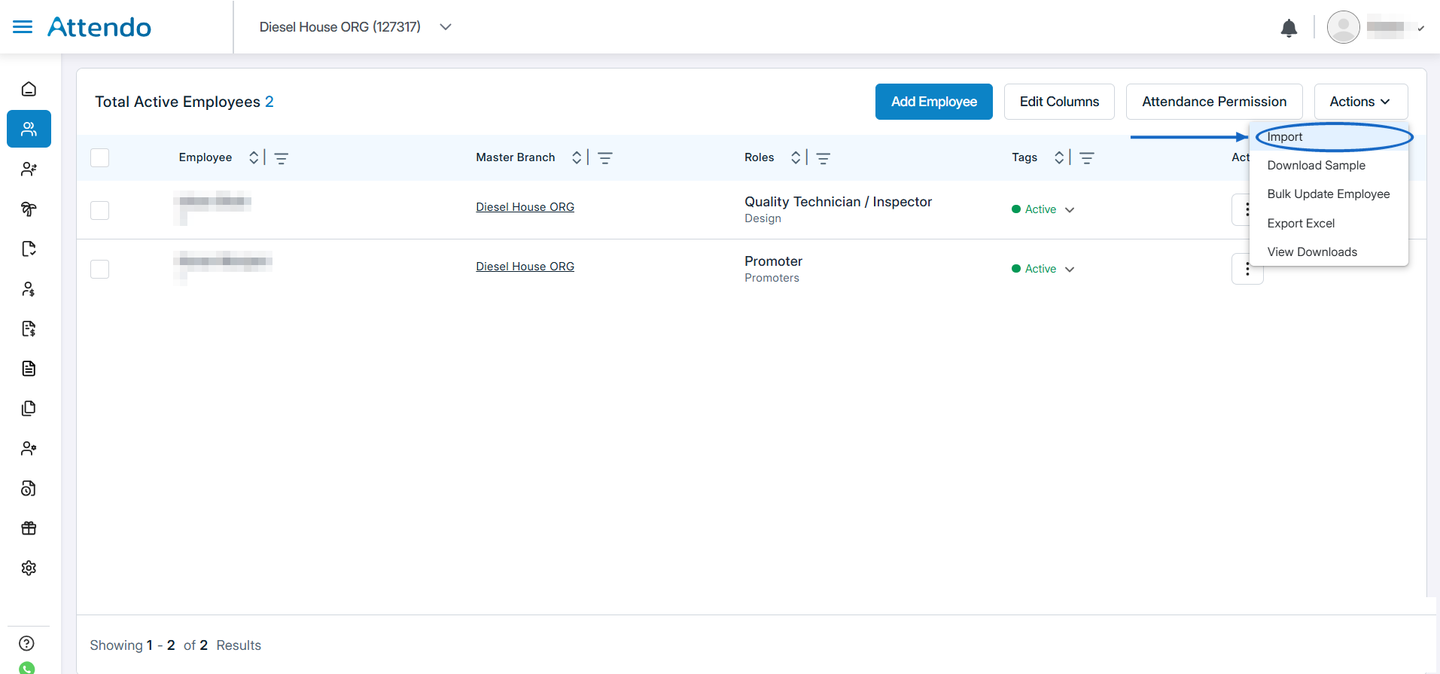
Attendo checks the sheet against the expected fields and flags anything missing before it writes a single record.
Key Highlights of Import
- Upload a batch of employees from a single sheet
- Missing or invalid entries are flagged before anything is saved
- The template names the fields Attendo expects, so a sheet either matches or tells you where it does not
- Records land in attendance, payroll and compliance together, not one module at a time
Step 5: Confirm the Employees Imported
Once the sheet is processed, a green Imported successfully confirmation appears in the top right, and the employee count at the top of the page goes up by the number of rows you uploaded. That count is the thing worth checking. If it has not moved, the import did not write anything, whatever the message said.
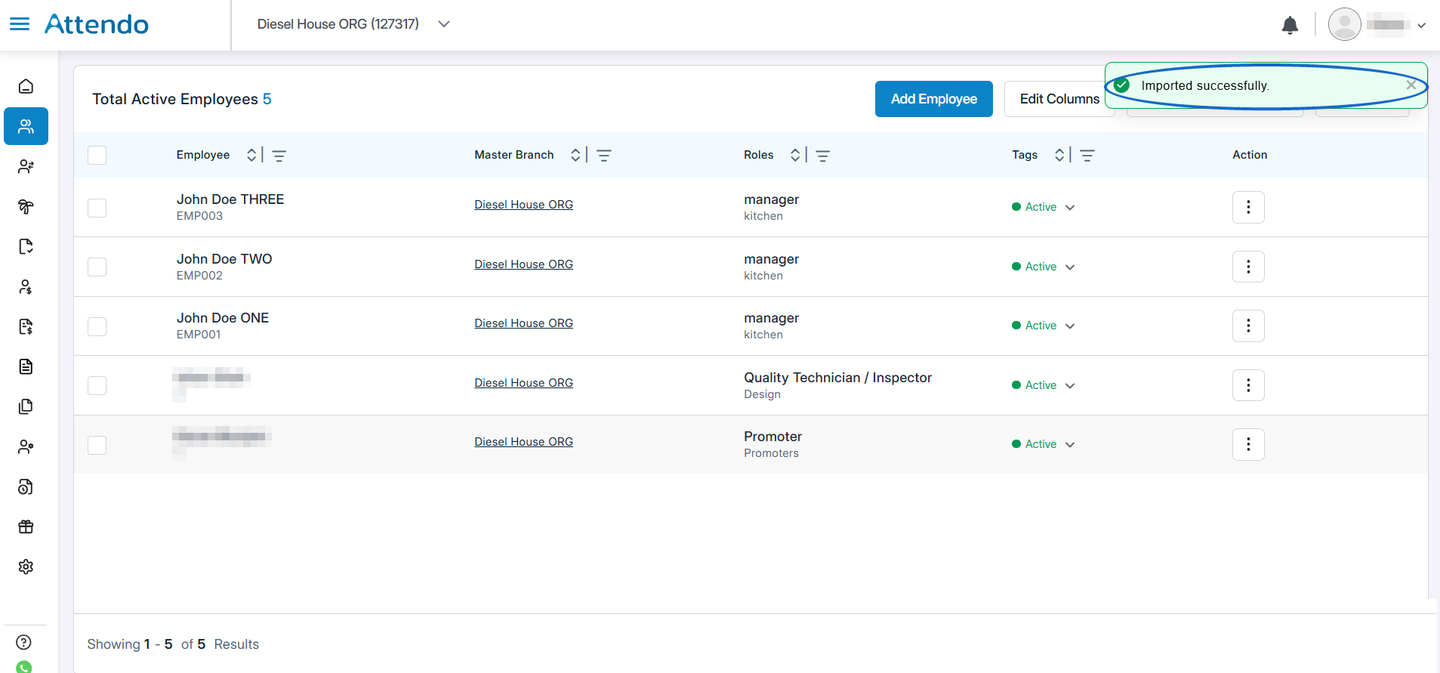
The employees are now in the system, and they appear across attendance, payroll and compliance without being entered again. Adding a single joiner later follows the one-employee flow instead.
What an Imported Employee Still Needs
The import creates the records. It does not finish the setup, and this is where a bulk import most often stalls: twenty employees exist in the system but cannot punch, or they punch and the payroll run ignores them. Four things decide that.
Biometrics, registered at the device
Every employee record carries a Biometrics Registered flag, and a spreadsheet cannot set it. A fingerprint or a face has to be captured at the device itself, on whichever of the three attendance devices the branch runs. This is what the Pending biometric setups count on the dashboard is telling you, and it is worth clearing in one session rather than discovering it on someone’s first shift.
Attendance permission, set per employee
Under Employees → Attendance Permission, each person has their own toggles for Mobile Attendance and Geo Fencing, plus a No. of Attempts setting that controls how many failed punches are allowed before the device locks them out. The default is seven. Employees in the same branch can be set up differently, so a field executive and a shop-floor worker do not have to share a method.
The right Payroll Group
Payroll is processed per group, not per employee. A Payroll Group holds the rules a set of employees share: the same attendance mode, the same overtime logic, the same compliance settings and the same pay frequency. Three groups ship configured out of the box, so a new business can run payroll on day one, but an imported batch still has to sit in the group that matches how those people are actually paid. The attendance-to-salary walkthrough covers how those rules turn a punch into a payable day.
Salary structure and KYC
The salary structure lives on the employee record and decides what the payslip is built from, alongside the rest of what Attendo runs. Aadhaar verification is separate: the masked PDF is uploaded, or the card’s QR code is scanned through the Admin App, and an admin then verifies or rejects it with a reason. Neither blocks attendance, but both need doing before a first payroll run.
How to Avoid a Failed Employee Import
A few checks keep an import clean:
- Keep your file format exactly like the sample template.
- Avoid special characters or empty columns.
- Use the same department and designation names already defined in Attendo. Departments and designations are managed as separate lists, so a typo creates a new one rather than matching the existing entry.
- Double-check branch codes before upload to prevent mismatched assignments.
Most failed imports come down to one of these four, and all four are quicker to check than to undo.
Why Bulk Employee Import Saves HR Time
Bulk import earns its keep at the moments when headcount moves in a block: a school taking on twenty teachers before the new term, a hotel staffing up for the wedding season, a fabrication unit adding a contract crew for a large order.
What that saves:
- Time: a joining batch goes in as one upload, not one record at a time.
- Accuracy: fewer typos, and no half-finished records.
- Reach: the records are live in attendance, payroll and compliance at once.
- Focus: the admin spends the morning on the joiners, not on the form.
Conclusion
Adding staff to payroll no longer needs to be a repetitive, error-filled process. Bulk Staff Import turns it into one file and one upload. The records land clean, they land once, and they are available to attendance and payroll the moment they land. Talk to the Attendo team if you are moving a whole workforce across rather than adding a batch.
Frequently Asked Questions
Q1. What file types does Attendo support for import?
Q2. Can I import staff from a system we used before?
Q3. What happens if my file has missing or invalid data?
Q4. Will imported data automatically sync with payroll and attendance?
Related Articles You May Like

How Half Day Leave Works, and What It Costs
Most guides treat half day leave as a fixed entitlement with fixed rules. It is not one. Here is what the codes actually settle, what your own policy has to, and how much money sits on the difference.
Ashwiniba Vaghela
HR & Payroll Experts

What Replaced the Contract Labour Act, and What You Must Do
Repealed in November 2025, and what replaced it asks more of you, not less. Work that runs past 120 days stops being intermittent, the licence caps how many people a contractor may supply, and the welfare bill splits in a way few businesses have priced.
Ashwiniba Vaghela
HR & Payroll Experts

Code on Wages Rules 2026, and Who Must Follow Them
They bind one narrow group of employers and nobody else. But every state is now drafting from them, so the eight-hour day, the ten-day ceiling and the Form V payslip are worth reading whoever you are.
Ashwiniba Vaghela
HR & Payroll Experts
Probation Period Rules in India, and the New Six-Month Term
Probation has a stated length again: six months, extendable by three, from 8 May 2026. Who that binds, who still writes their own number, and why PF and ESI never paused for probation at all.
Avani Joshi
HR & Payroll Experts